Project Management

Mar 25, 2019 • 8 min read

Topic
Author
In This Blog
It’s every project manager’s dream to deliver high-value work on time with less resources. And so began the quest for an optimal project management software.
Among the many apps and tools that promise best-in-class solutions for PMPs, Atlassian Jira stands out for its ability to adapt to teams and how they prefer to work. The software has a lot to offer with premium features, complemented by a plethora of third-party add-ons.
To help you get more out of this incredible tool, we’ve put together these 7 powerful hacks for Jira project management.
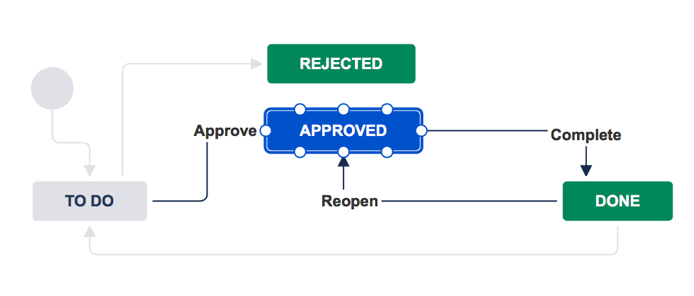
The challenge: To create different workflows that support all kinds of teams.
Part of a project manager’s role involves managing issue statuses and transitions from start to finish. In Jira, that process is called a “workflow.”
By default, an issue is managed through the “to do – in progress – done” path, but you can (and should) build custom workflows to match the way your teams work.
Note: Only a Jira administrator can create and edit workflows.
Keep your workflow simple to alleviate potential delays along the project pipeline. For tasks that require multiple review and approval stages, you should consolidate steps instead of adding on new ones.
For instance, let’s compare this editorial workflow…

…to this one:

You can add the feedback loop by creating a transition from “Review” to “Draft.” Here’s how you can edit a Jira workflow:
Once you have created the ideal workflow for a project team, remember to activate it so that all team members can access it. To do so, you’ll first need to assign the workflow to a workflow scheme, then associate the workflow scheme with a project.
To add your workflow to a workflow scheme:
To associate a workflow scheme with a project:
Make sure that you have discussed within the team to ensure the workflow reflects your organization’s standard procedure. For instance, whether to label an issue that is being reviewed “In progress” or “On hold.”
The challenge: You need to optimize the time spent on each task for maximum productivity.
Abraham Lincoln famously said, “Give me six hours to chop down a tree and I will spend the first four sharpening the ax.” We couldn’t phrase the “work smarter, not harder” mantra any better.
To drive results, you need to focus on what brings value to your project, instead of working aimlessly just to meet deadlines. Modern PMPs rely on project management tool like Jira to cut down the administrative work and focus on higher value tasks.
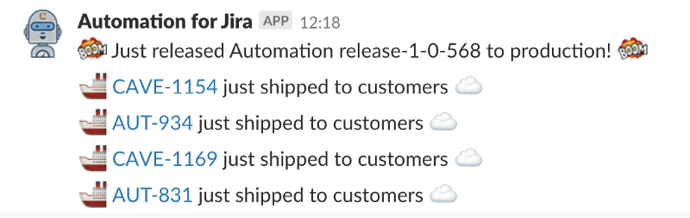
For this hack, we recommend Code Barrel’s Automation for Jira plugin. With Automation for Jira, you will have the ability to:
For instance, your developers can automate the deployment process after a sprint using the following triggers…

…and then share the releases across the organization:
The challenge:
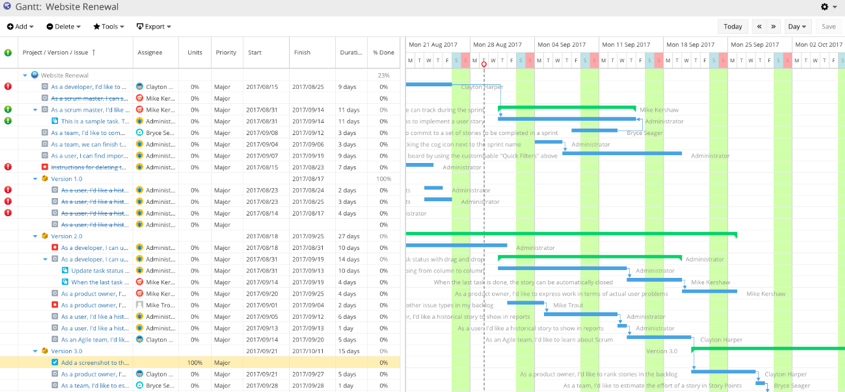
You need to visualize dependencies and effectively manage project complexity. Project management isn’t easy. You have to juggle multiple tasks, teams, and deadlines to ensure that you deliver your project on time and on budget.
Jira certainly helps, by enabling greater transparency and collaboration across the board. But one thing many project managers miss is a simple way to visualize dependencies, milestones, critical paths, and the overall project timeline.
On the other hand, project managers may also want to develop an all-encompassing roadmap to visualize long-term business strategies and future project developments.
This is what Gantt charts bring to Jira.
If you are looking for ways to integrate Gantt charts to manage your projects more effectively, simply install a third-party plugin like Ricksoft’s WBS Gant-Chart for Jira (available on the Atlassian Marketplace).
Here’s an overview of a Gantt chart in Jira:
Read this blog post to learn how to use Gantt charts for project planning.
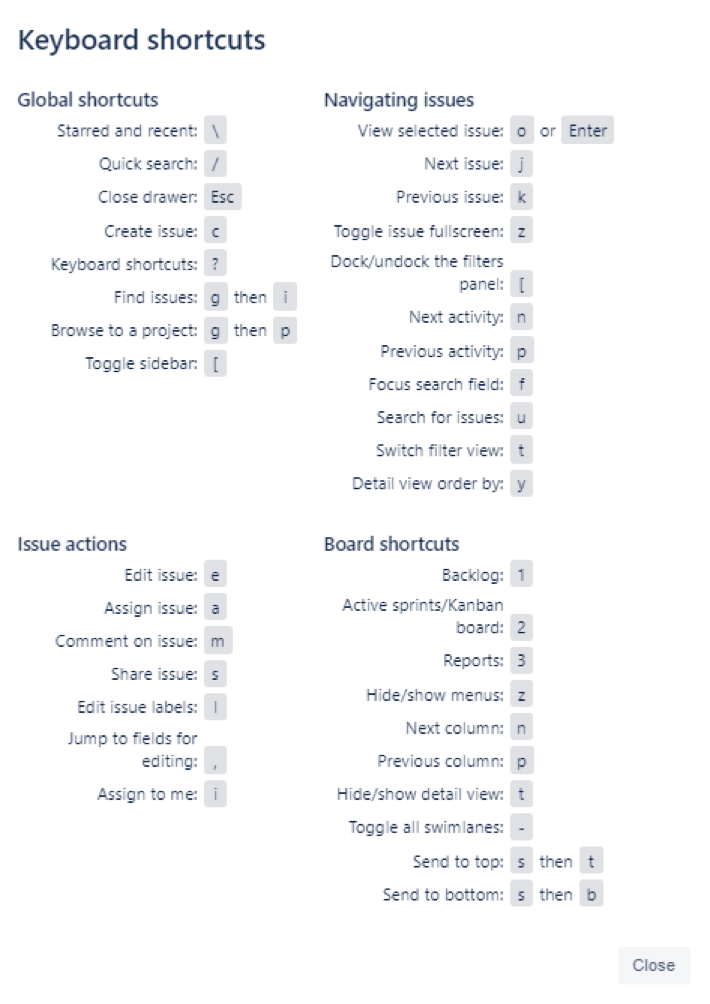
The challenge: Expedite common actions in Jira.
As with many applications, shortcuts are like magic wands that help you perform various actions in Jira within seconds. If you use Jira on a daily basis, it pays to familiarize yourself with these shortcuts. Think of the amount of time saved when you maneuver the software.
To get a full list of keyboard shortcuts at any time, simply press the “?” key outside of the text field. This will trigger the “cheat sheet” as shown below:
For a detailed breakdown of how and when these keys are best used, read this handy guide to Jira keyboard shortcuts by Atlassian.
The challenge:
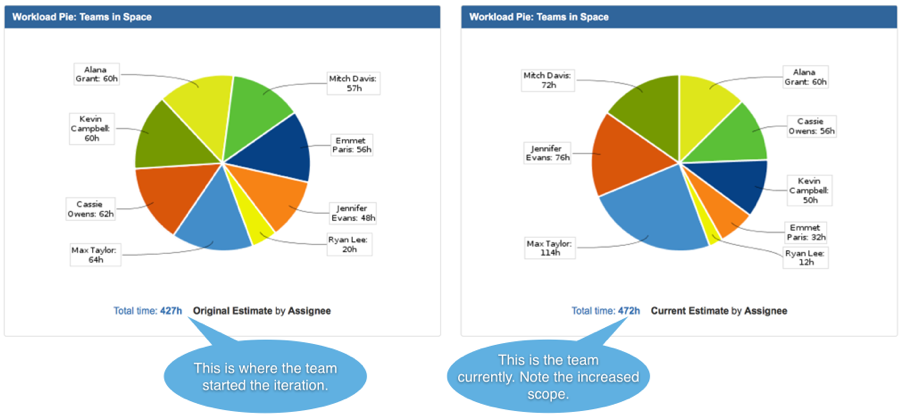
Rebalance work for your team to ensure they have enough work in an iteration. Using the Time Tracking feature in Jira, you can accurately estimate work as your team logs the amount of time spent on an issue. Simply enable the feature following these steps:
Pro tip: To configure Time Tracking, read this documentation for more details.
By measuring the team’s actual capability and progress, you can improve the workload allocation for every project in the future. Jira will automatically aggregate that data to present in several reports. See below for a sample Workload Pie report:
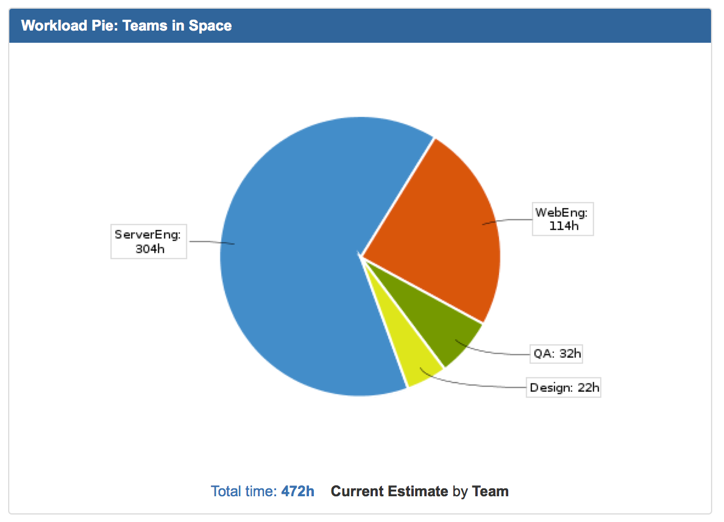
To plan work based on the team’s collective skill sets, you can tag the skills required to each respective user story in the project plan, and the Workload report will show you Estimation by Team:
With this workload allocation, your teams can flexibly move on to the next important issue as soon as they complete their major tasks. It’s also a good practice to encourage everyone to expand their skillsets by continuously taking on tasks in the current iteration. For example, front-end developers can work on back-end code and vice versa.
The challenge: Constantly optimize the order in which your team should work on issues.
All issues are not created equal—that’s why Jira provides priority fields. Depending on the nature of your project, Jira allows you to triage issues based on your project framework.
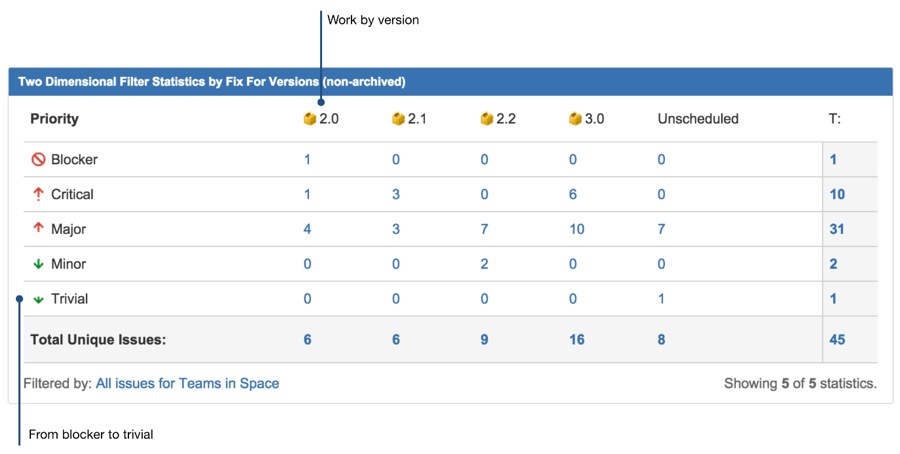
The most granular way to view the urgency levels of all issues is by using a built-in gadget called Two Dimensional Filter Statistics Gadget. It’s a table that reflects the priority levels of all your issues by versions, with default priorities include: blocker, critical, major, minor, and trivial. This helps you to determine the next logical task to tackle.
Here’s a sample overview of issue priority:
To add this gadget on your Jira dashboard, login to your Jira admin account and follow these steps:
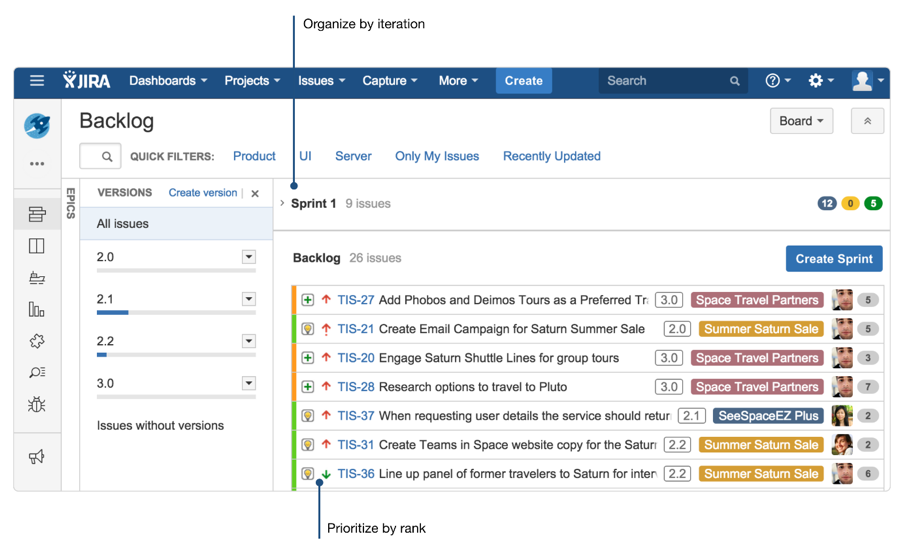
Another method to organize issues by their priority, especially for agile teams, is via backlog overview. In agile projects, all issues are displayed in the order of their urgency, so your team knows to focus on the items at the top of each sprint. Likewise, Kanban teams would continually pull the top issue off of the backlog.
As a project manager, keep in mind that the priorities are not set in stone. If a “flag” arises (an issue that cannot be moved forward), you’ll need to communicate with the team to determine if the current priority needs adjustment.
The challenge: Access information in Jira quickly to manage a project.
Every Jira user should be familiar with the basic search function in Jira to find:
But did you know that you can perform advanced searches with Jira Query Language (JQL)?
JQL is a set of structured queries that lets you search for Jira issues dynamically. Your search results can then be exported to MS Excel. A JQL query consists of a field, an operator, and values or functions.
Example:

This query will return the issues in your TEST project.
Let’s try to search for all issues assigned to a single person in the TEST project. Here’s how your query would look:

For a complete JQL tutorial, you can enroll in this free Atlassian training: Gain Project Insights Through JQL (Cloud and Server).
Once you have learned these 7 hacks, you’ll be surprised at how much more productive you’ll be in Jira. We recommend that you break them into separate learning points for more thorough understanding and practice.
BONUS: [Free eBook] The Project Manager’s Guide to Atlassian Apps