A risk is an event or a set of events that, should they occur, will have an impact on the achievement of project objectives.
Now the thing with risks is they are inevitable. No matter how meticulous your project planning is, you can only minimize risks at best because a majority of risks stem from external factors, beyond human control.
However, that doesn’t mean that risk management is impossible. As long as you can identify, track, and mitigate your risks, you can control their impact. Tracking, for one, will allow you to capture all the relevant data about the risks. This then enables you to make better, more informed decisions on how to mitigate them.
If you’re managing your projects in Jira, then you can also use the platform to manage your risks. This article will guide you through the process of tracking and mitigating your risks in Jira, so continue reading to learn more.
What Kind of Jira Project Risks Are There?
As a PM, you’ll face various types of risks throughout your project cycle. Listed below are some common risks that you should take note of.
Siloed Communication
Poor communication is one of the most business-impacting risks in project management. It’s absolutely key that as the PM, you make sure that your team members are aligned with each other to avoid this risk which could affect team performance, quality of delivery, and collaboration efforts.
Lack of Clarity
A lot of PMs tend to ignore an essential part of project planning – making sure that there’s enough information to support each task. When there’s little to no context provided, team members can’t work on the tasks assigned to them. Lack of clarity can also involve unclear directions from clients as well as stakeholders.
Scope Creep
Scope creep happens when project objectives are not clearly outlined, the requirements are not documented thoroughly, and sprints are not planned out attentively. Most of the time, scope creep occurs when you implement last-minute changes or accept clients’ ad-hoc requests without proper evaluation.
Overstretched Resources
Your resources include your project cost, talents, tools, and time. If you misallocate or overstretch any of these, you will put your project at risk. Typically, overstretched resources are a result of frequent scope creep and siloed communication. You need to be aware of how you manage your resources against project development plans.
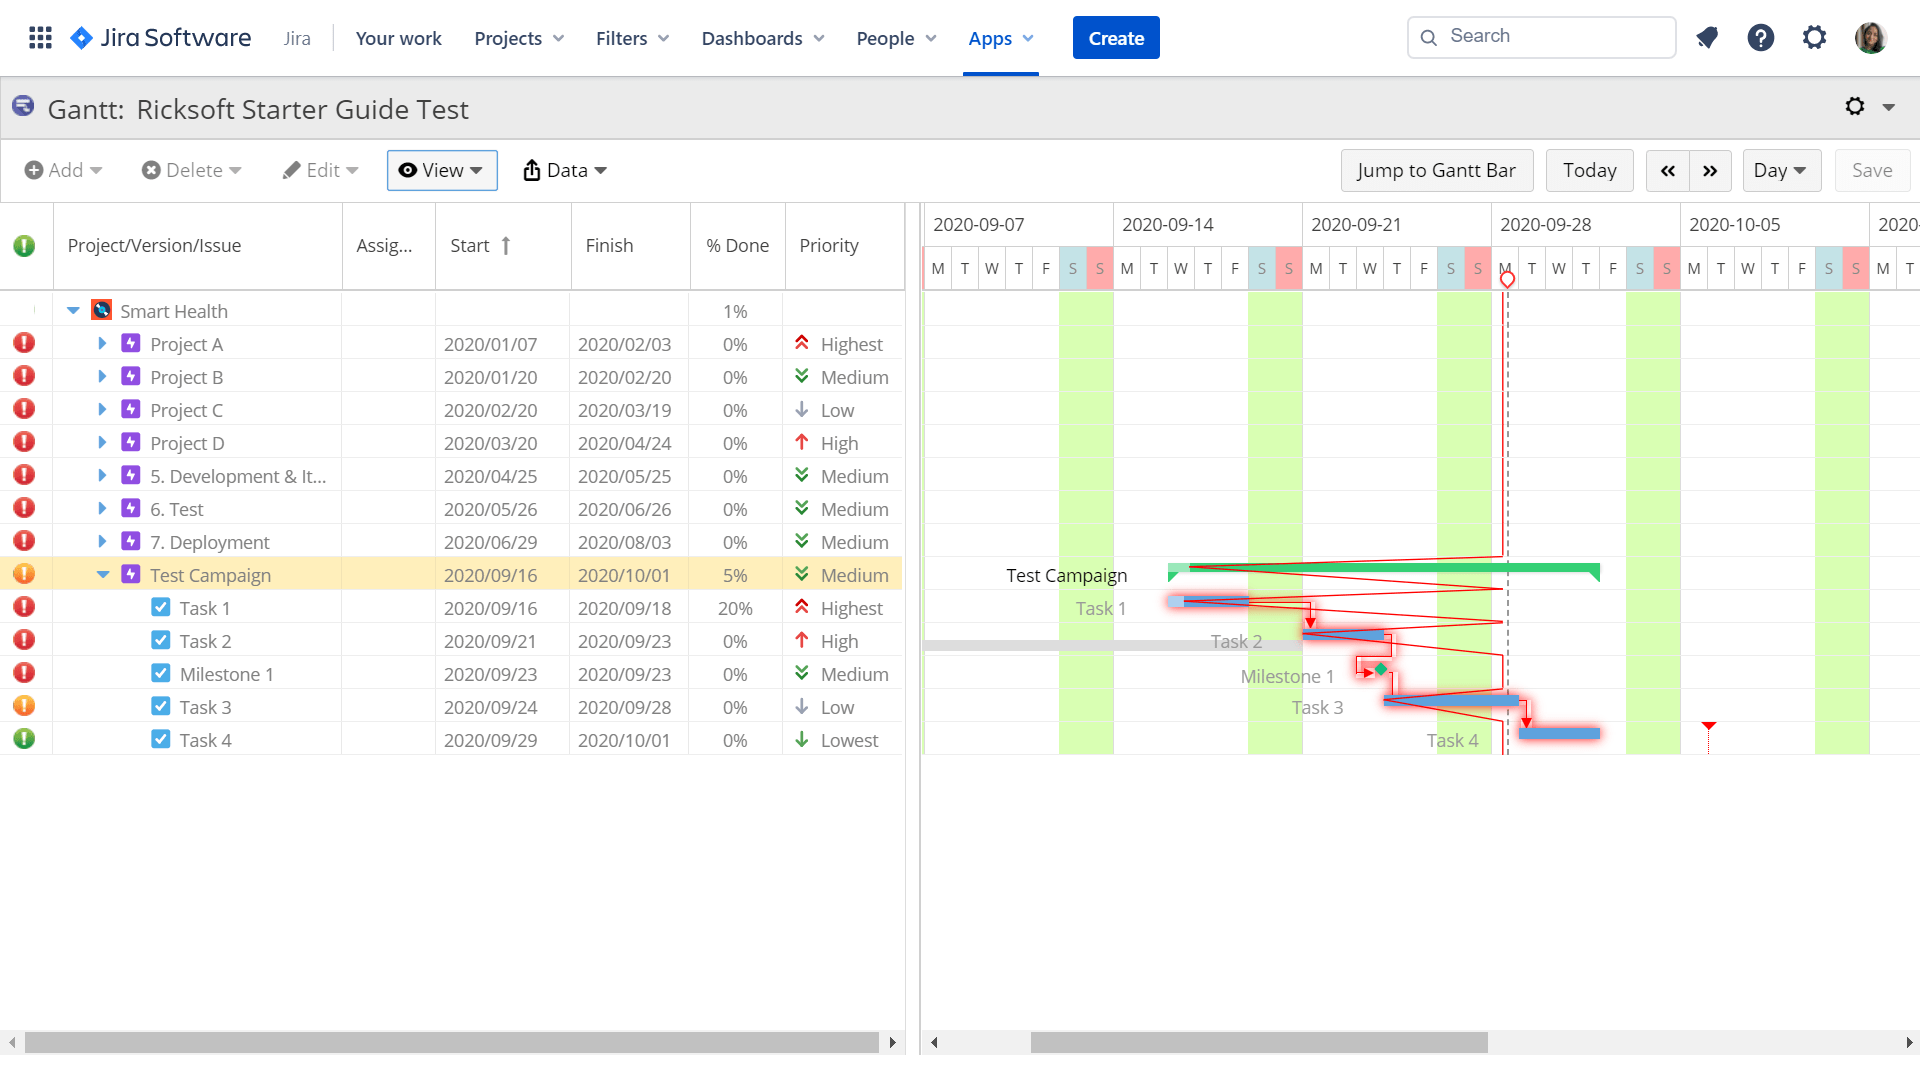
The best way to do this is by using a Gantt chart. A comprehensive app like WBS Gantt-Chart for Jira easily allows you to create charts for multiple projects and track issues effectively in Jira.
Roadmap Misalignment
If you and your teams are not aligned with the roadmap, then there will be chaos throughout your project lifecycle. For one, you’ll have scheduling issues because your development goals aren’t following the roadmap. Another problem will be poor prioritization across each iteration without distinctive sprint objectives.
Ever hear the saying prevention is better than cure? That’s exactly why PMs need a proper monitoring and control system in place to deal with risks and blockers before they become serious. Read our Jira Project Monitoring and Control: A Comprehensive Guide e-book to learn more!
How Do You Track Project Risks in Jira?
In Jira, you can use the kanban or scrum board feature to see your issues and track their current status. This is the simplest way to have a general overview of your project. For a more elaborate view, you can use the Jira Issue Navigator screen where you can see all the data related to an issue and even filter them based on column data.
This feature can help you manage risks as you can label issues as risk-based.
Create Risk Issue Types
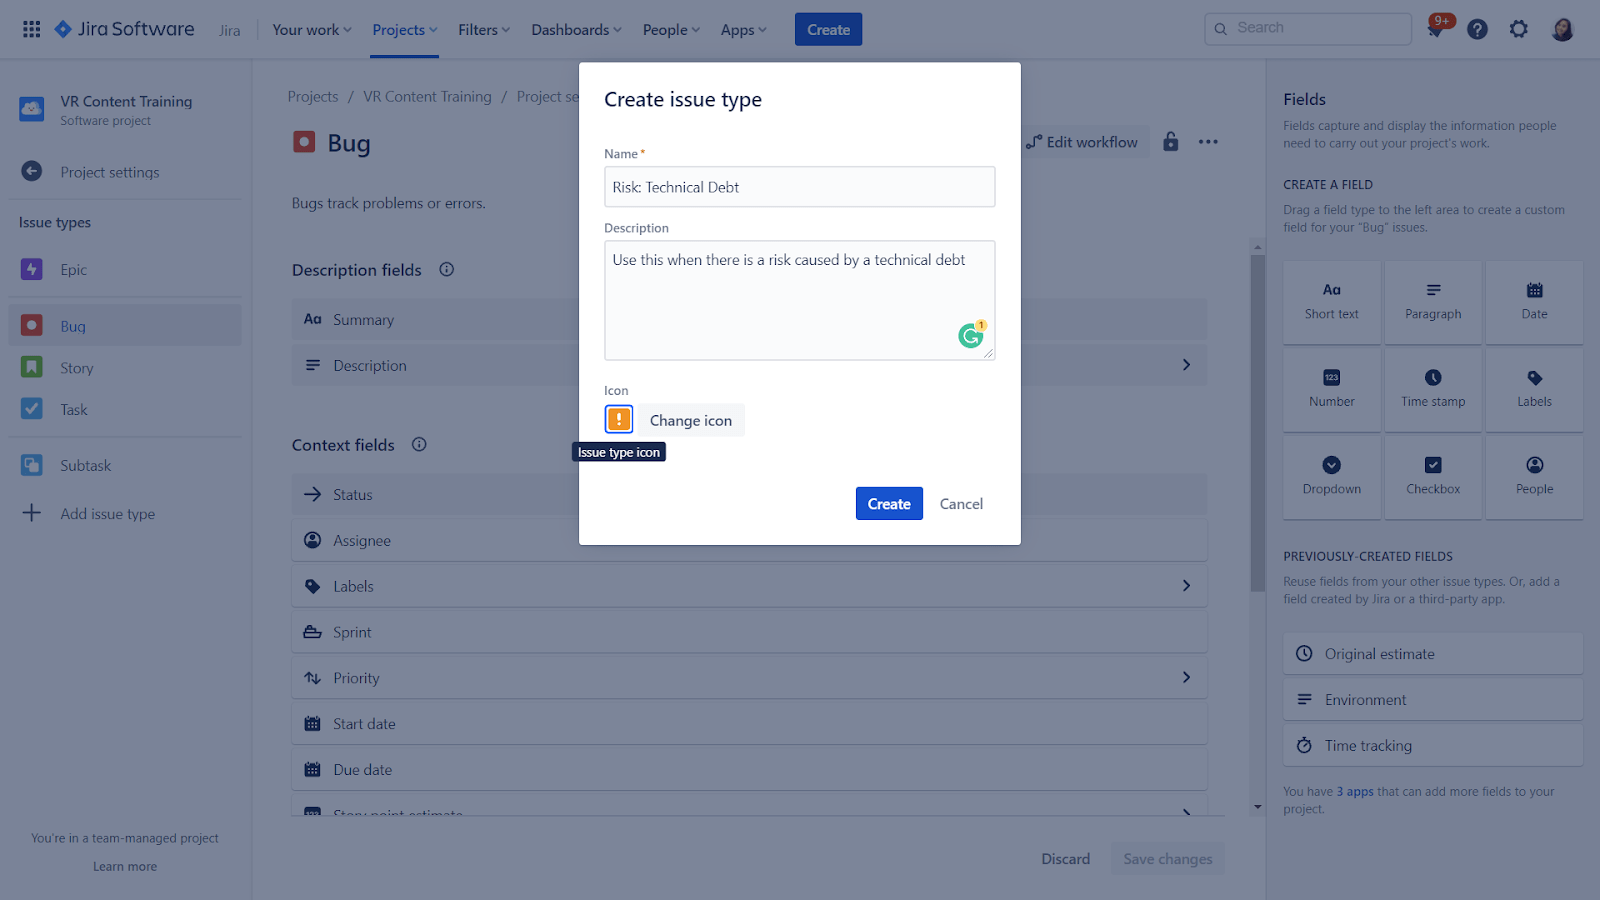
When you create your project in Jira, you have the ability to create new issue types and workflow and customize them to fit the project needs. Typically, you would have the standard issue types like Epic, Task, Sub-task, Story, and Bug.
To add risk as an issue type, you can go to your project sidebar, select Project Settings, then click Issue Types. Next, select Add issue type and you can add a risk issue type then.
However, the most effective way to track your issues has always been through the use of Gantt charts.
Leverage Gantt Chart Capabilities
Of course, this capability isn’t available in Jira but you can still leverage it by employing solutions like WBS Gantt-Chart for Jira.
Gantt chart risk tracking provides a clear view of where your risks fall across your project schedule. This will then allow you to
- evaluate how urgent these risks are,
- determine the resources that you need to allocate to resolve the risks,
- and identify other possible risks that may occur due to current risks.
Once you have achieved this, you can then decide on the best risk mitigation plan to implement.
It’s key that you bring this capability to your Jira instance because it can significantly improve project management processes from planning to monitoring, as well as improve risk issue tracking. Not only that, you can have a bird’s eye view of all your issue dependencies, milestones, and critical paths.
How Can You Mitigate Your Risks?
A series of steps are involved in mitigating your risks.
Once you’ve identified the risk, you must analyze it by gathering as much data as possible so that you can evaluate its impact, cause, workload, and resource requirements.
Next, you capture and track the risk as issues in your Jira (as explained in earlier sections) so that you can better understand how it will impact your project schedule and resource allocations.
Then, prioritize the risk, just like you would prioritize other issues in your project so that everyone on the team is aware that it needs to be resolved. Only when you’ve prioritized your risks can you allocate the right resources (assignees & time frame) to enable it to be resolved appropriately.
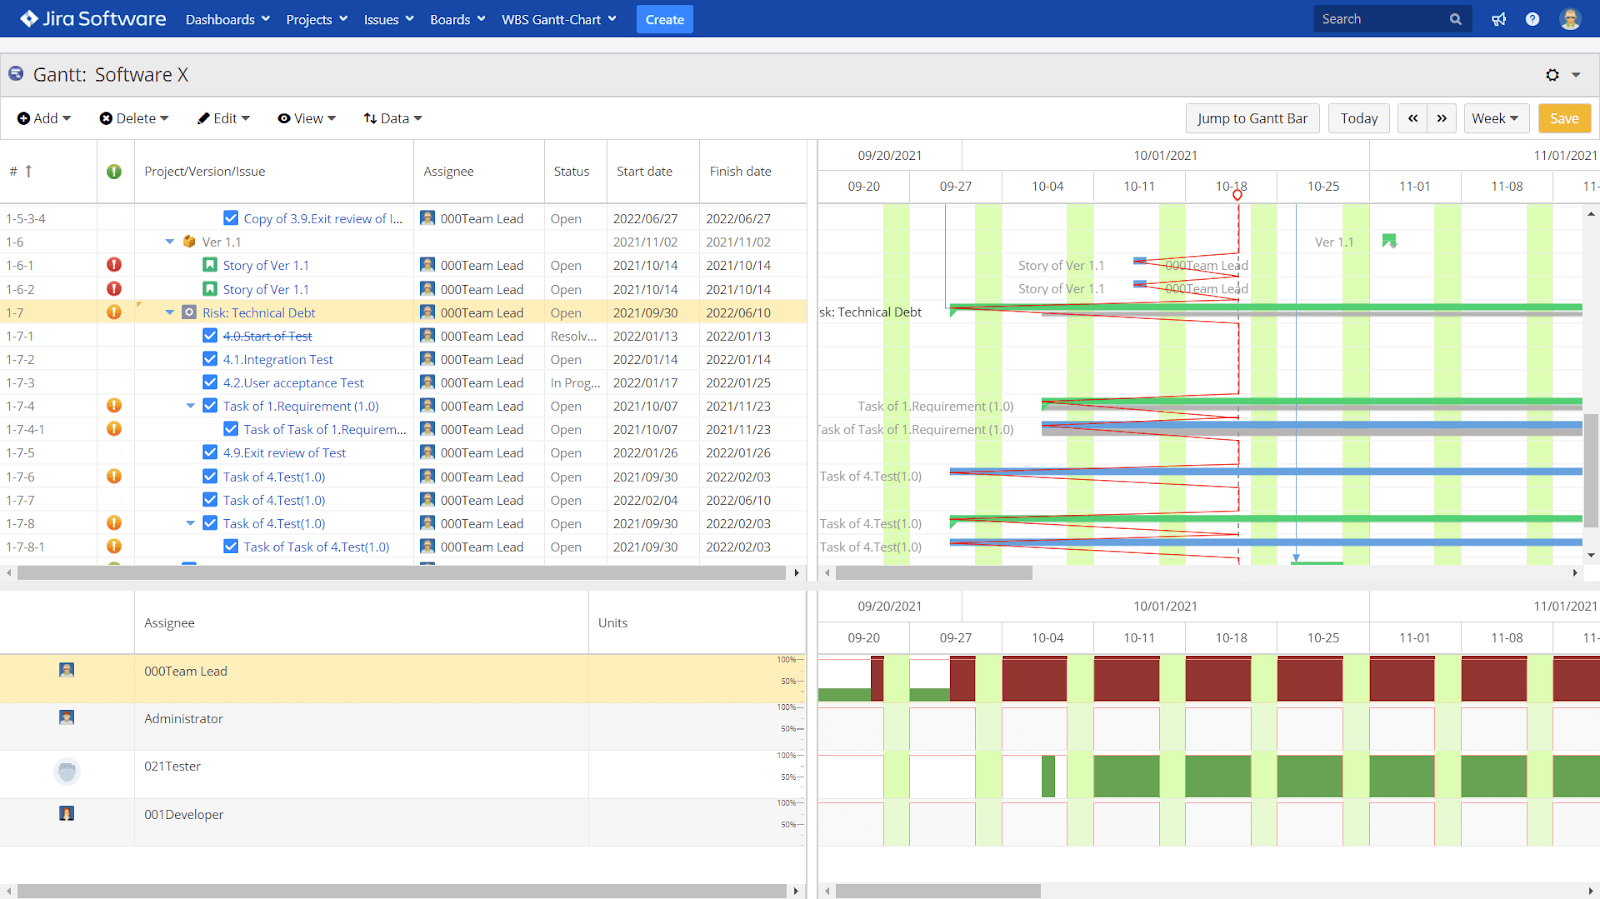
This is where the WBS Gantt-Chart’s resource allocation feature would come in handy. When you select a risk issue in your chart and enable the resource view, you can assess the assignee’s workload against time.
A red line bar indicates that the assignee has reached their maximum daily workload and green if otherwise.
Bring the Power of Gantts to Your Jira
Project risks should not be taken lightly and managed mindlessly. It’s key that you invest in proven capabilities to improve your risk management processes. Try WBS Gantt-Chart for Jira for free today. Additionally, you can read our guide and e-book to hone your current skill set!
